In the previous post, I talked about the build menu.
Now it’s time to talk about another part of the User Interface—windows.
This post will probably be even longer than the last post, so I might once again break it up into multiple posts (because I don’t want to spend more than 3 hours writing a blog post when I could be working on Starmancer.)
Window Basics
Before we start, here’s an example window. It hasn’t been visually polished yet. I told Victor that he should wait to polish until I’m completely finished with everything.

An ore refinery without any resources.
That window is composed of a few different areas. From top to bottom:
Permanent / static elements
Top Panel (with the tabs)
Middle Panel (with the inventory area)
Bottom Panel (with the “Offline” and “Copy” button)
Here’s a visual representation. Please acknowledge my MS Paint skills.

Window layout, beautifully illustrated
In general, each UI element is created, and then positioned on the correct panel.
Creating Elements
Next, some object has to create and populate a window with all sorts of button, images, text, etc.
At the highest level, it works like this:
Object is selected
Window is created (if it doesn’t already exist)
Window is populated with object.
(By the way, this is exactly how the game menu is populated. They use the same system)
Tabs
At a lower level, each object is responsible for providing where each element is supposed to go. For window elements, this requires providing a Tab, and a Panel position.
Only one tab can be active at a tab. UI elements are ignored if their tab is not active.

Windows use a tab system
Internally, tabs are actually just UI elements. They’re placed on a special tab—the “Any” tab. This tab is always considered active. The offline and copy buttons are also placed on the “Any” tab.
Layered Population
There’s actually multiple layers involved in populating window elements.
First, the Ore Refinery populates a window with a “Window Entry”. A typical entry looks like a blank template. The big window is only responsible for positioning the entry. It’s not responsible for filling it with elements.
Next, the Window Entry is itself populated with elements. This second layer of elements could come from anywhere. In the case of the inventory entry, some data is provided by the Ore Refinery and some is provided by each item.
Essentially, the entry is another window.

Window population involves multiple steps
I feel like I didn’t explain that well enough.
Here are the steps, but with specific examples:
Window is created
Window is populated with the inventory “Entry” by Ore Refinery
(Inventory Entry is currently blank)
Inventory Entry is populated with header text and item data by Ore Refinery and all items
Refreshing UI
The layered population distinction is important when it comes to refreshing UI elements.
Imagine that the inventory tab of the Ore Refinery window is open when a colonist drops off some ore.
It would be annoying if you had to close and re-open a window for changes to be shown. Ideally, the window would immediately refresh and display the new ore.
To achieve this, we do something like:
UI.RefreshAllWindowsThatReference(this);
(I’m using a different IDE, Rider, and it’s much more difficult for me to copy and paste code examples)
Then, each window checks if any of its populating objects was the changed object. If it was, the entire window is refreshed.
The practical effect of this is that when the Ore Refinery is changed, the entire window is refreshed, but when an item is changed, only the inventory entry is refreshed.

Windows are refreshed automatically
We also don’t allow any windows to be refreshed until the start of the next frame. This prevents the same window from being refreshed multiple times in the same frame.
Buttons
Simple buttons, like “Turn Offline” are easy enough to implement. Each button is assigned a key when created. When the button is clicked, it invokes the “OnClicked” event and passes its key to its creating object.
Then, whatever component cares can subscribe to OnClicked and perform some action if their button was clicked.
But life isn’t always so simple.
Consider the button responsible for unassigning jobs. When clicked, that button needs to tell its colonist that a specific job should be removed.
The code would be something like:
Data jobData = onClicked.GetJobData();
colonist.UnassignJob(jobData);
This, in turn, requires that the job button populates onClicked with the relevant information.
Job related buttons have to forward their associated job to the colonist
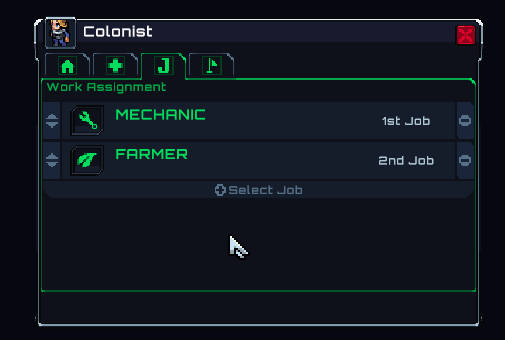
Popups
Some buttons create pop-up windows too.
Internally, the Window Entry is responsible for creating the pop-up (as opposed to the source object). In part, this is because the window has to be disabled while the pop-up is active, and also because a colonist shouldn’t know anything about a pop-up.
The pop-up also has to be provided with all of the population data. So every element from the Window Entry is forwarded to the pop-up. For the job pop-up this requires forwarding the header “Select Job” and all of the valid jobs for the colonist.
Then, when a button on a pop-up is clicked, it can optionally be forwarded to either the source colonist, the Window Entry that created, it or its own pop-up window.

All elements are forwarded to pop-ups
One Window to Rule Them All
Every object (including) colonists uses the exact same window system. This makes it fairly easy to give the player unique control on any relevant object.
A heater allows the player to adjust the temperature. Shelves can be set up to accept specific items. Farms can change their grown crop.
We do our best to design every new system so that it allows for as much flexibility and depth as possible. This takes longer initially, but we don’t want to limit the potential of Starmancer with sloppily designed features.
-Tyler
